How to Use Natural Light to Enhance Your Travel Photos
Travel photography is all about capturing the essence of a moment, freezing time in a frame that tells a story. One of the key elements that can truly transform your travel photos is natural light. The way sunlight interacts with your subjects can make or break a shot, so understanding how to use natural light to your advantage is crucial for creating stunning travel images.
When it comes to enhancing your travel photos with natural light, it's essential to grasp the different characteristics of light and how they can impact your photography. From the soft, gentle light of early morning to the harsh, direct light of midday, each type of natural light brings its own unique qualities to your images.
One of the most magical times for capturing travel photos is during the golden hour, the period shortly after sunrise or before sunset when the light is soft, warm, and diffused. This is the perfect time to experiment with different techniques and settings to make the most of the enchanting light that bathes your surroundings.
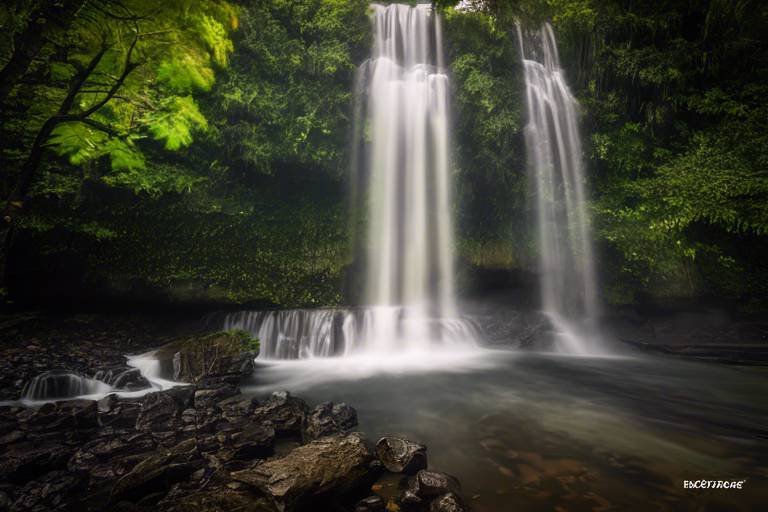
Understanding the distinction between soft light and harsh light is crucial for creating captivating travel photos. Soft light can create a gentle, flattering glow that enhances your subjects, while harsh light can cast strong shadows and create a more dramatic effect. Learning how to work with both types of light can elevate the mood and composition of your travel images.
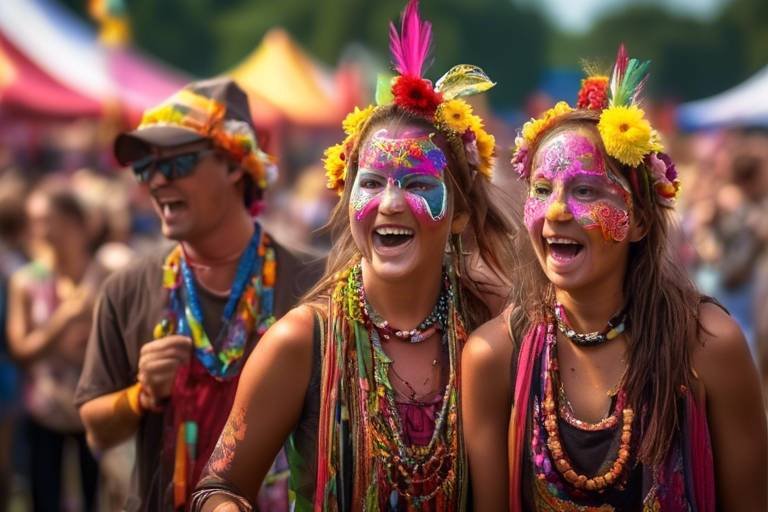
Shadows are not always something to avoid in photography; they can be used creatively to add depth and interest to your travel photos. By playing with light and shadows, you can create dynamic compositions that draw the viewer's eye and evoke a sense of mystery and intrigue.
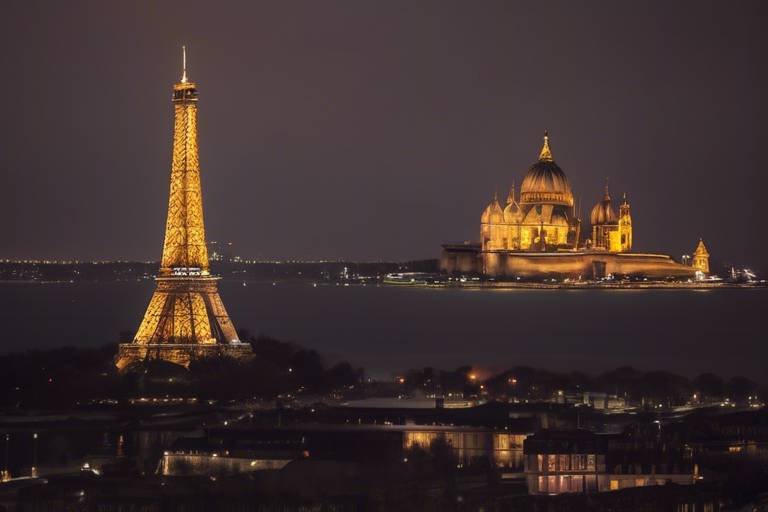
For those looking to add a touch of drama to their travel photos, mastering the art of backlighting is essential. By positioning your subject in front of a direct light source, such as the sun, you can create striking silhouettes and glowing effects that add a sense of magic to your images.
Reflectors are valuable tools for manipulating natural light in your travel photography. By bouncing and redirecting light, you can control the intensity and direction of light to achieve the desired look in your photos. Experimenting with reflectors can help you enhance the natural light in your images and create professional-looking results.
When shooting indoors during your travels, making the most of natural light can be a game-changer for your photos. Understanding how to position yourself, adjust angles, and optimize settings can help you leverage indoor lighting to capture captivating images that convey the atmosphere of your surroundings.
Post-processing is another crucial step in enhancing natural light in your travel photos. By using editing tools to fine-tune exposure, colors, and contrast, you can elevate the quality of your images and bring out the full potential of the natural light captured in your shots.

Understanding Natural Light in Photography
Natural light plays a crucial role in photography, especially when it comes to capturing travel moments. Understanding how natural light works and how it can influence your photos is essential for creating stunning travel images. Natural light is dynamic, changing throughout the day and depending on weather conditions. It can create different moods and effects in your photos, adding depth and character to your travel memories.
When it comes to photography, natural light can be classified into different types such as direct sunlight, diffused light, and golden hour light. Each type of natural light has its own characteristics and impact on the final outcome of your photos. Direct sunlight can create harsh shadows and high contrast, while diffused light softens shadows and produces a more even illumination. The golden hour, occurring during sunrise and sunset, offers a warm and magical quality of light that is highly sought after by photographers.
Understanding how to work with natural light is essential for any photographer looking to enhance their travel photos. By observing the direction, intensity, and quality of light, you can adjust your camera settings and composition to make the most of the available light. Whether you are shooting landscapes, portraits, or street scenes, being able to harness the power of natural light can elevate your travel photography to a whole new level.

Golden Hour Photography Techniques
The golden hour, also known as the magic hour, is a period shortly after sunrise or before sunset when the sunlight is soft, warm, and diffused, creating a magical glow in the sky. This time of day offers photographers a unique opportunity to capture stunning travel photos with a beautiful, golden hue. During the golden hour, the angle of the sun creates long, soft shadows and adds a warm, flattering light to your subjects, enhancing the overall mood of your photos.
To make the most of the golden hour in your travel photography, it's essential to plan ahead and be prepared to shoot during this brief window of time. Start by scouting your location and determining the best spots to capture the golden light. Consider the direction of the light and how it will interact with your subjects to create dynamic compositions.
When shooting during the golden hour, adjust your camera settings to take advantage of the warm, soft light. Use a lower ISO to reduce noise, a wide aperture to create a shallow depth of field, and a slower shutter speed to capture the rich colors and textures of the golden hour. Experiment with different angles and compositions to find the most compelling shots, and don't be afraid to play with backlighting and silhouettes for added drama.
One of the key techniques for golden hour photography is to use the light to your advantage. Position your subjects in the direction of the light to create a warm, glowing effect, or use the sidelight to add depth and dimension to your photos. Pay attention to the quality of light and how it interacts with your surroundings, as subtle changes can make a significant impact on the mood and atmosphere of your images.

Soft Light vs. Harsh Light
When it comes to photography, understanding the difference between soft light and harsh light is crucial for creating captivating travel images. Soft light, often found during the golden hour or on cloudy days, produces gentle and diffused shadows, resulting in a flattering and smooth appearance on subjects. On the other hand, harsh light, typically seen during midday when the sun is directly overhead, creates strong and defined shadows with high contrast, which can add drama and intensity to your photos.
Imagine soft light as a gentle hug, wrapping your subject in a soft glow, while harsh light is like a spotlight, highlighting every detail with precision. Knowing how to work with both types of light can elevate the mood and atmosphere of your travel photos. Soft light is ideal for creating a serene and dreamy ambiance, perfect for romantic landscapes or intimate portraits. In contrast, harsh light can add a sense of energy and boldness, making architectural details pop or creating dynamic patterns in street photography.
One technique to soften harsh light is to use a diffuser or reflector to scatter the sunlight, creating a more flattering and even illumination on your subjects. Alternatively, embracing the dramatic shadows of harsh light can add a sense of mystery and intrigue to your travel photos, especially when capturing silhouettes or high-contrast scenes.

Using Shadows Creatively
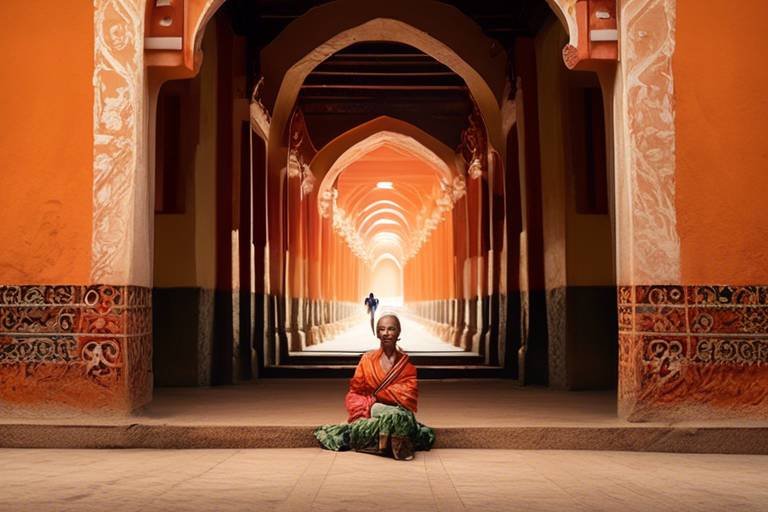
Shadows play a crucial role in adding depth and interest to your travel photos. When used creatively, shadows can enhance the mood and storytelling of your images, making them more visually compelling. One technique to creatively use shadows is by incorporating them as leading lines in your composition. By strategically placing shadows in your frame, you can guide the viewer's eye towards the main subject, creating a sense of movement and intrigue.
Another way to utilize shadows creatively is by experimenting with silhouette photography. Silhouettes can evoke a sense of mystery and drama in your travel photos, especially during sunrise or sunset when the light is at its most dramatic. By positioning your subject in front of a bright light source and exposing for the background, you can create striking silhouettes that capture the essence of a moment in a unique way.
Furthermore, playing with the contrast between light and shadow can result in dynamic compositions. By emphasizing the interplay of light and shadow, you can create visually striking images that draw the viewer's attention and evoke a sense of emotion. Whether it's capturing the play of light filtering through foliage or the dramatic shadows cast by architectural elements, embracing shadows can elevate the artistic quality of your travel photos.

Backlighting for Dramatic Effects
When it comes to creating stunning and captivating travel photos, mastering the art of backlighting can truly elevate your images to a whole new level. Backlighting refers to the technique of positioning your subject in front of a direct light source, such as the sun, to create dramatic effects and silhouettes. This technique can add depth, mood, and creativity to your travel photos, making them stand out from the crowd.
One of the key benefits of using backlighting is the ability to create a sense of drama and mystery in your photos. By positioning your subject in front of the light source, you can create striking silhouettes that emphasize shape and form, adding a sense of intrigue to your images. The contrast between the bright background and the darkened subject can evoke a sense of emotion and storytelling in your travel photos.
When using backlighting, it's important to pay attention to the positioning of your subject to achieve the desired effects. Experiment with different angles and compositions to find the perfect balance between light and shadow. By playing with the positioning of your subject in relation to the light source, you can create dynamic and visually engaging photos that draw the viewer in.
Additionally, backlighting can help create a sense of depth and dimension in your travel photos. The way the light interacts with the elements in your scene can add texture and interest, enhancing the overall composition of your images. By incorporating backlighting into your photography, you can create images that have a sense of depth and visual impact, making them truly memorable.
Mastering the art of backlighting requires practice and experimentation. Start by observing how light interacts with your surroundings and how it can be used to create different effects in your photos. By understanding the principles of backlighting and honing your skills, you can take your travel photography to the next level and capture truly stunning and dramatic images that tell a story and evoke emotions.

Reflecting Natural Light
When it comes to capturing stunning travel photos, understanding how to reflect natural light can significantly enhance the quality of your images. Reflectors are essential tools for manipulating light and creating the desired atmosphere in your photos. By bouncing natural light off a reflector, you can soften harsh shadows, illuminate dark areas, and enhance the overall brightness of your subjects.
Reflectors come in various shapes, sizes, and materials, each serving a specific purpose in redirecting light. Silver reflectors are ideal for increasing the intensity of light, while white reflectors provide a softer and more diffused light. Gold reflectors add a warm tone to your photos, perfect for creating a cozy and inviting atmosphere.
Positioning the reflector strategically is key to achieving the desired lighting effects. By angling the reflector towards your subject, you can control the direction and intensity of the reflected light. Experimenting with different angles and distances will help you find the optimal lighting setup for each shot.
Using reflectors in outdoor settings can be particularly effective during the golden hour, as the soft, warm light enhances the natural beauty of your surroundings. By harnessing the power of reflectors during this magical time of day, you can elevate your travel photos to a whole new level of artistry.

Indoor Natural Light Photography Tips
When it comes to capturing stunning travel photos indoors, harnessing natural light is key to achieving captivating results. Understanding how to make the most of the available light sources can greatly enhance the quality of your indoor photography. Positioning yourself strategically in relation to windows or other light sources can make a significant difference in the overall look and feel of your images.
One effective technique for indoor natural light photography is to pay attention to the direction of light. Side lighting can create dramatic shadows and highlights, adding depth and dimension to your photos. Experimenting with different angles and positions in relation to the light source can help you achieve the desired mood and atmosphere in your indoor shots.
Additionally, adjusting your camera settings to optimize exposure is crucial when shooting indoors. Balancing the exposure to avoid overexposure or underexposure can help you capture the true essence of the indoor environment. Consider using a lower ISO setting to minimize noise and achieve sharper images in natural light conditions.
Furthermore, incorporating reflective surfaces strategically can help bounce and diffuse natural light, creating a softer and more flattering illumination for your indoor subjects. Utilizing mirrors, whiteboards, or even simple reflectors can help you control and manipulate the light to achieve the desired effect in your indoor photography.
Experimenting with different compositions and framing techniques can also elevate your indoor natural light photography. Playing with shadows, textures, and patterns can add visual interest and uniqueness to your indoor shots. Don't be afraid to get creative and explore unconventional angles to capture the essence of the indoor space.
Remember, practice makes perfect when it comes to mastering indoor natural light photography. Take the time to experiment with different lighting conditions and settings to hone your skills and develop your own signature style. With patience and persistence, you can unlock the full potential of natural light in indoor photography and create stunning travel images that truly stand out.

Editing Tips for Natural Light Photos
When it comes to editing natural light photos from your travels, there are several key tips to keep in mind to enhance the beauty of your images. One important aspect is to adjust the exposure levels to ensure that the natural light in your photos appears balanced and pleasing to the eye. By fine-tuning the exposure, you can bring out the details and colors captured in the natural light, creating a more vibrant and engaging image.
Another crucial editing tip is to work on the colors of your natural light photos. You can enhance the warmth and richness of sunlight in your images by adjusting the color temperature and tint settings. This allows you to bring out the golden tones of natural light, making your travel photos more visually appealing and inviting.
Contrast plays a significant role in editing natural light photos. By adjusting the contrast levels, you can add depth and dimension to your images, emphasizing the interplay of light and shadow captured in the natural light. This helps to create a more dynamic and captivating visual experience for viewers, drawing them into the scene you have captured.
Utilizing editing tools to sharpen the details in your natural light photos can significantly enhance the overall quality of your images. By carefully sharpening specific areas of the photo, you can highlight intricate patterns, textures, and elements illuminated by natural light, creating a more refined and polished look for your travel photos.
When editing natural light photos, it's essential to maintain the integrity of the original scene while enhancing its beauty. Avoid over-editing or altering the natural light to the point where it distorts the authenticity of the moment captured. Strive to enhance the natural light in your photos while preserving the genuine atmosphere and mood of your travel experiences.
Frequently Asked Questions
- What is the significance of natural light in travel photography?
Natural light plays a crucial role in setting the mood and enhancing the quality of travel photos. It can add warmth, depth, and a sense of authenticity to your images, capturing the true essence of the moment.
- How can I make the most of the golden hour for photography?
The golden hour, occurring during sunrise and sunset, offers soft, golden light that can transform your travel photos. To maximize this magical time, try shooting with the sun at a low angle and experiment with different compositions to create stunning visuals.
- What are some tips for using shadows creatively in travel photography?
Shadows can add drama and interest to your travel photos by creating contrast and depth. To use shadows creatively, try incorporating them as leading lines, framing elements, or to highlight textures, adding an extra dimension to your compositions.
- How can reflectors enhance natural light in indoor photography?
Reflectors are valuable tools for manipulating natural light indoors, allowing you to bounce and redirect light to illuminate your subjects effectively. By using reflectors strategically, you can control the intensity and direction of light, resulting in beautifully lit indoor travel photos.
- What editing techniques can I use to enhance natural light in my travel photos?
Post-processing tools offer a range of options to fine-tune natural light in your travel photos. You can adjust exposure, colors, and contrast to bring out the best in your images, ensuring that the beauty of natural light is preserved and enhanced in your final results.